
Over time, car seats may develop stains, rips, and tears. Instead of shelling out a significant amount of money on professional repairs or replacements, why not take control and find a unique, cost-effective solution? By using a leather patch for the car seat, you can restore your car’s interior without breaking the bank. These patches are durable and can seamlessly blend with your existing furnishings. They can make your seats look better and last longer, even if they have minor scratches or significant damage. Many car owners find the best leather patch for car seats online or search for local options like ‘leather patches for car seats near me‘ to quickly resolve their seat issues.
With only a few basic tools and methods, you can make old chairs seem as good as new ones. With just a minimum understanding, one may easily repair car seats to cover rips and holes. This tutorial will teach you all you need to know about how to pick the finest leather patch for a car seat and even find options like leather patches for car seats at Walmart or custom leather patches for car seats on PatchVilla if you prefer local stores.
However, as for cost, the bigger the hole, the higher the repair cost you may have to incur whether or not you opt for local stores. But if you prefer the DIY method. Get ready to modify how the interior of your automobile looks!
Below are the listed methods or steps that one has to follow while deciding about the leather patch for car seat restoration.
Steps Need to be Followed While Making Decision About a Leather Patch for Car Seat
Step 1: Assess the Damage on Your Car Seat
The first thing you need to do to repair your car seat is to check for damage. This crucial evaluation informs you what needs to be fixed and how long it will take. Look closely and inspect every aspect of the seat, including the edges and any signs of wear or tear.
- Look for discoloration, which might signal that the item has been used a lot. Look for cracks; if you don’t mend them, they usually become worse. Many people use a self-adhesive leather patch for car seats for small cracks.
- Also, consider if any other spots could require your attention later on. Check for extensive incisions that could need to be sewn up.
- Find places where the paint may not cling well. Take note of any threads that aren’t tight around the stitches.
- Find out how much the change needs to be. Find out what sort of leather it is so you can choose a patch that works with it, like the best leather patch for car seats or even black leather tape for car seats for thin tears.
- Taking your time now can help you recuperate faster. The first step to utilizing a leather patch correctly is to do a detailed study.
Step 2: Gather Materials and Tools
Before you start mending anything, make sure you have everything you need. Getting things ready can help you work quicker and not be interrupted.
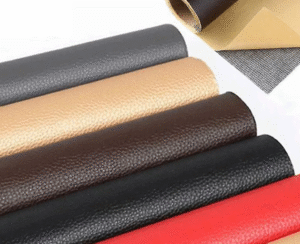
You should start with a lovely leather patch for a car seat that matches the color and texture of your automobile seat. Look for goods that indicate they are the greatest leather patches for seats, or get a complete leather seat patch kit, which makes the job easier.
Next, lay down some strong adhesives that will work on leather. This will keep the patch on your seat for a long time.
You’ll also need scissors or a utility knife to cut the patch to the proper size. A scale may help you acquire the perfect fit by giving you specific dimensions.
Before you use the product, make sure you have cleaning supplies like leather cleaner or rubbing alcohol on hand.
If you create a mess while this is going on, have some soft clothes ready.
- Good leather patch
- Very sticky
- Comes with scissors and a tool knife
- Ruler
- Things to clean
Step 3: Preparing the Leather Patch For Car Seat
Preparing your leather patch for a car seat is a vital step to make sure the repair goes well. First, choose the patch that matches the color and texture of the rest of the seat the best. This will help you create a repair that doesn’t get in the way.
Be extremely cautious when you trim the patch to fit. It should run out at least half an inch on both sides beyond the fractured region for optimal bonding.
Before putting it on, make sure the surface of the vehicle seat and the back of your self-adhesive leather patch for the car seat are immaculate. It won’t stick as well if there is dirt or dust on it.
You may wish to apply sandpaper on the edges of the patch to help the glue stay better. This rough skin makes things cling together better.
Test anything to make sure it fits properly before you fasten it securely. This little detail can make a significant impact on how professional everything else looks.
- Choose a kind of leather that matches with it.
- Cut carefully so you don’t hurt yourself.
- Clean all surfaces very carefully.
- To help them stick, sand the sides a bit.
- Before you use it for real, try it on.
Step 4: Applying Adhesive and Placing the Patch
You have to put the adhesive on the right way for a leather patch for car seat repair to work. First, make sure that both the patch and the leather seat are clean and dry. This will help the adhesive stay together better.
Choose a strong adhesive that is manufactured especially for leather. After applying the glue equally on both sides, follow the manufacturer’s instructions for how long to let it cure.
After a while, gently put the patch over the crack in your automobile seat. Press down on it firmly but gently to ensure it attaches properly and doesn’t split or bump. This also works for a leather patch for a car armrest if needed.
Putting weight on top of the patch as it cures may make it safer.
- Use an adhesive that is meant for leather.
- Before you add adhesive to the surface, make sure it is clean.
- Do what the package says to do for drying times.
- Before pushing down, make sure the patches are in the right place.
- You may want to use weights to hold objects in place while they dry.
If you do these things, your repair will stay longer and look better.
Step 5: Blending in the Patch with the Rest of the Seat
The leather patch for the car seat must match the rest of the seat when you put it on. The patch shouldn’t stand out too much. The idea here is to achieve a uniform appearance that appears natural and goes together beautifully.
- Look closely at the leather surrounding it first. Look for variations in color, texture, and any patterns that could be on the original material.
- Use leather dye or colorant that is the same color as the seat.
- Add thin layers slowly; less is more. It can be simpler to modify if you lightly sand the sides. A soft cloth might assist in getting rid of excess color.
- Before you try it on, let it dry for an extended period.
- If you pay great attention to the little details in this stage, it will not only appear better but also stay functional. This thorough method makes sure that the treatment lasts a long time and keeps the inside of your automobile looking excellent.
Maintenance Tips for Your Repaired Car Seat
It’s crucial to take care of your fixed car seat to keep it looking beautiful and last longer. The leather patch for the car seat will remain in place and match the rest of your furniture if you take care of it. Regular repairs can help you prevent greater damage over time.
- First, use a pH-balanced cleanser formulated for leather and a delicate cloth to clean the area. Don’t use harsh chemicals on the patch or the original material. They can hurt both.
- You could also wish to apply a leather conditioner every two months. This preserves the leather from cracking, keeps it supple, and helps the colors seem better.
- Be cautious not to spend too much time in the sunshine. UV radiation may make colors fade and make materials less intense. When you park, utilize sunshades to keep your seats safe as much as you can.
- Also, be sure to mop up spills soon away so that stains don’t set in. A dry towel works excellently to get rid of the stain swiftly.
- To detect issues early and prevent having to perform costlier repairs, check the patch every so often for indications of wear.
Also, taking care of your newly repaired seats will make sure they remain in good condition for a long time. When you restore your seat, keep in mind that utilizing high-quality materials like the best leather patch for a car seat or a trusted leather seat patch kit will offer you better results over time. If you follow these procedures, you may make a big difference in how well you patch little rips or substantial wear and tear on your car’s upholstery. This do-it-yourself solution will give the interior of your vehicle a fresh appearance and save you money at the same time!
Conclusion
Putting leather patches on car seats is a simple and easy solution to make them look wonderful again and help them endure longer. Suppose you have the correct equipment and know-how. In that case, you may produce professional-looking results without spending a lot of money. If you measure the damage accurately, use the proper equipment, prepare your patch properly, carefully apply it, and make sure it matches the rest of the seat, you may create a superb repair. Whether it’s a quick leather patch for a Walmart car seat or a nearby shop, you can manage the leather patch for car seat cost easily and get great results.
FAQ
Question: Can you patch leather car seats?
Yes, you can fix leather car seats with a leather patch.
Question: Do leather repair patches work?
Yes, leather patches work well to cover rips and holes.
Question: How much does it cost to fix a hole in a leather car seat?
The cost depends on how big the hole is and how bad the damage is.
Question: How do professionals repair holes in leather auto seats?
Pros: clean, fill the hole, use glue, and match the leather color.